Friday, January 3, 2014

Highlights of Art II

   Currently I am in an Art III class, but I thought it would be cool to post some of my older projects as well. The following projects were the highlights of the Art II class I took last spring as a sophomore.
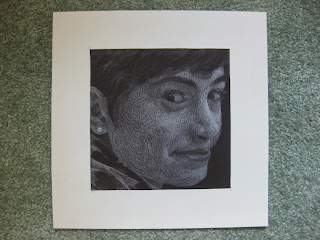
Self portrait -- white pencil on black paper
   The first project we did in Art II required thinking about drawing in a new way. With normal pencil or charcoal you draw shadows, but with white pencil you have to learn to see the highlights. As Mrs. Koefler said poetically, "You have to learn to see the light instead of the dark." To lessen the confusion of thinking backwards, we used a grid, marking up a picture and then filling in corresponding squares on the final project. This is one of my favorite works I've ever done.
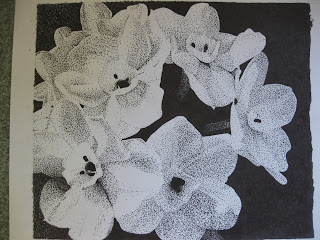
Daffodils -- pen and ink
   Our second project also required us to focus on highlights and shadows, and we still couldn't draw outlines. Using a black and white picture (I took the one of the daffodils myself), we again used a grid method and stippled in the shadows. Stippling is a tedious process, because an entire picture is created from tiny dots that have to be drawn individually. The pen kills your hand after a while. But, from far away, it creates a beautiful effect, especially if the graduation of shadow is done well and there is high contrast.
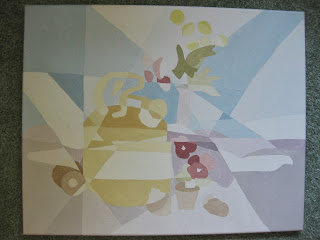
Cubism piece -- acrylic on canvas
   The next project we did looked at cubism and its elements. We had to use and mix eighty low-intensity colors -- ten tints of red, orange, yellow, green, blue, purple, brown, and black. This means that from the base colors of red, blue, and yellow, we made five other base colors, and then added the complementary color of each base to make each hue less vibrant. Then, we added the base to white, slowly increasing the amount of base and painting after each addition to make ten tints. Our paintings also had to incorporate three elements of cubism -- mine includes simplification and fraction lines.
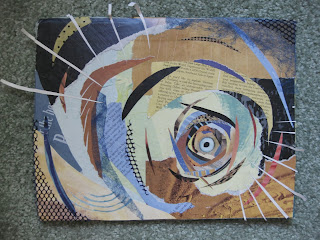
Collage -- paper and miscellaneous on cardboard
   In another unit, Mrs. Koefler taught us about the difference between the terms 'abstract' and 'non-objective.' To the everyday art observer, anything that is not realistic-looking is labeled abstract art. However, the word 'abstract' refers to images and objects that are recognizable but distorted. Artwork that contains lines, colors, shapes, and other hokum but does not portray something is considered non-objective (get it? no object.) For example, Salvador DalĂ­'s paintings of melting clocks are abstract art; they contain distorted clocks, trees, and other objects. A canvas of splattered paint, on the other hand, would be non-objective. To help us understand the difference, Mrs. Koefler instructed us to make a collage. We were to implement the elements of art -- create movement, have a focus and texture, and use colors, line, and contrast to guide the viewers eye and make the piece stronger. Turning the collage every few minutes to get a new angle also helped ensure that the piece was non-objective and pleasing to the eye from any direction.
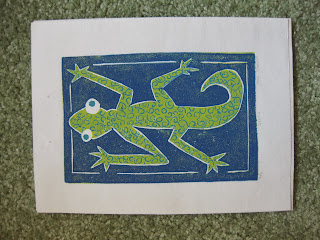
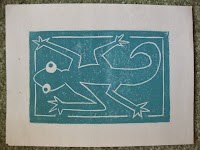
Gecko prints -- ink on paper
   One of our final projects in Art II was print making. We could either use a Plexiglas or linoleum to stamp our prints, and since I was unused to linoleum blocks, I thought it would be fun to experiment. After much deliberation, I decided to make a gecko print. We were allowed to use up to three colors of ink, and the color of the paper added a possible fourth color. Print making is tricky for two main reasons. When carving the linoleum, you have to think backwards from the end result, and it's mind-boggling at first. The space you carve isn't what will be colored -- the negative space, or uncarved linoleum, is where the ink goes. For my gecko, I printed three layers -- teal, then green, then dark blue. I first carved all the outlines, then printed in teal to get a teal rectangle with a white outline. Then, I carved out the lizard's eyes and curly-cues of the gecko's body so that they would remain teal and printed green, so everything but the white outlines, curly-cues, and eyes were green. Lastly, I carved out the rest of the gecko and printed blue to get the blue background. The second challenge in print-making is getting the lines to match up. To heighten the chances of getting the perfect print, you print multiples. I ended up with nine finished geckos.
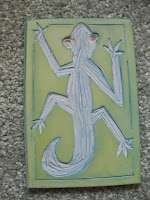
the linoleum block stamp used to make the geckos
the first layer in making the gecko
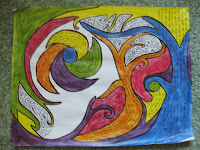
Just a doodle. Acrylic and pen on paper.

Perspective: Castles in the Air

"Castle in the Air" -- Oil pastel on cardstock with miscellaneous
The original castle
      For this project, Mr. Sands instructed us to implement perspective somehow, plain and simple. We looked at many examples of perspective -- anamorphosis, 1-, 2-, and 3-point, forced, and localized. I knew immediately I wanted to draw a 2- or 3-point perspective castle, but I wanted the piece to be more exciting than a simple drawing. After watching a Honda commercial that used many optical illusions, I decided to use localized perspective in my work. I brainstormed for a while, and remembered one of my favorite quotes:

"If you have built castles in the air, your work need not be lost; that is where they should be. Now put the foundations under them." -- Henry D. Thoreau

     Before I could incorporate the localized perspective and quote into my project, I had to start simple. I looked at pictures of real castles, and using them as a reference, I drew my own castle using three-point perspective. (There are two points at the sides of the horizon line and one at the top, so you get the effect of looking at something very tall from the ground.) Then, I outlined it, photographed it, and projected the image.
Coloring the castle with oil pastels
     In the mean time, I had created a stand for my floating castle. Using copper wire, I twisted seven little stands and hot-glued them to a piece of foam board I had painted black. Then I placed different sized pieces of cardstock into the little stands and adjusted them so the whole castle would be covered and the cards could stand up on their own. I projected the image onto the cards and tried to trace the outline. This was very challenging; as soon as my pencil touched the paper, it would move slightly, throwing off the whole thing. After several tries, I got enough faint lines down to be able to finish. I estimated where the outlines were supposed to be and colored in the castle with oil pastels. Then, I used a Q-tip dipped in baby oil to smooth out the pastels to make the image more presentable. To get more contrast, I shaded some areas with charcoal.
     Once I was done coloring, the hard part began. I had labeled the stands and cards before I began drawing on them so I'd be able to put them back. I adjusted the cards so they lined up as much as possible -- it took a lot of crouching and gentle touches to align them perfectly (and they're still not perfect). When the cards were set up, I took some glue and attached the cards to the stands, making sure not to disturb them. Once dry, I cut off some of the excess cardstock and covered the remainder in cotton ball "clouds."
     At some point in the middle of this process, I took a break to draw and color the quote banner with colored pencil. I wrote out the quote and outlined it in pen, then cut it out. I placed the banner in a shorter stand glued in the front, finishing the project. Localized perspective means that the image can only be seen from one point. My "point" ended up being below the edge of the castle, so for viewing on Fun Friday, I put the castle on a stool on the table for easier viewing.
     Of the projects I've done this year, I'm happiest with the outcome of this one. While some elements were challenging, the overall result was more finished and to my liking than previous projects.


Thursday, December 5, 2013

Layering: Lights and Leaves

"Beauty in Death" -- Acrylic gloss, leaves, yarn, embroidery thread, copper wire, miscellaneous

     To plan for our layering project, Mr. Sands had us write out a list of 20 possible mediums to layer with. I immediately had two ideas, and I knew I was going to do one of them. For a while now I've been wanting to do a sculpture involving scraps of cloth and yarn hanging from the ceiling; I though maybe I could layer them to form a picture from afar. I soon realized that the effort required for such a project would be too much for just one person, so instead I turned to another long-held desire of mine.
     Mrs. Koefler, my Art II teacher, often used a clear acrylic gloss to suspend thread, pictures, magazine clippings, and other miscellaneous scraps. After applying layer after layer, she could peel off the dried plastic and have a see-through collage. Because of that, I wanted to experiment with the gloss as well, but I decided to mix it up and try to make it 3D. Inspired by the beautiful colors of fall, I decided to layer leaves, then shine a light through the gloss to reveal the leaves' original colors and the new values created by overlapping.
Testing -- Gloss or Modge Podge?
     The first step was to decide which clear gluey substance to use. In other projects involving layering around balloons, Modge Podge has been proven to hold, but I knew gloss would create the thick texture I wanted. So I tried both. After the first day, the Modge Podge balloon had popped and the Modge Podge had crinkled up into something that looked like a ball of Saran wrap. I decided to go with the acrylic gloss. However, the gloss balloon slowly deflated as well, and I had a problem. Mr. Sands's balloons were too thin and easily popped, and they weren't very spherical either ( I wanted domes of leaf gloss, not balloon shapes). So, I went to the store and bought my own balloons, and for the next few days, I applied the gloss as thick as I could and carefully taped them to different bases. (Pulling off the tape to try to re-inflate the balloons had weakened the latex).
     The next challenge was the leaves. I went on several walks and collected many, but applying them directly with just gloss as adhesive didn't work. The leaves were too bumpy, refused to stay, and began rotting fairly quickly. I handily whipped out my flower press and began half-drying and flattening the leaves, and suddenly glueing them on became much easier. For the thicker parts, like the main veins and the stems, I used Elmer's glue. Trying to make one balloon at a time became too tedious; there was a lot of waiting time while layers dried, so I started a new balloon. To add another element, I drew some funky flower-esque designs directly on the balloon, and hoped the ink would stick to the gloss.
     After I had my gloss-leaf layering technique down, the whole project became an experiment. I knew I was making orb-looking things with leaves stuck on them, but I didn't have an image of the final project. As I neared to the end of my layers, I started taking the stems off of the bigger leaves. I thought I could glue them on in little bunches to give the balloons more of a 3D effect. When I finally popped the balloons and peeled them away, the gloss didn't hold its shape as well as I'd hoped. To support it, I tried to make a skeleton out of copper wire, but in the process of hot-glueing it in, the stems began to break off. In the end, I just removed them.
     As everything came together, the pieces seemed to lack something -- a definite meaning. Mr. Sands encourages us to make our art illicit emotion and express feeling. Leaves and gloss polymer don't really do that. Personally, I love the colors of fall. To me, they are an expression of nature's true wonder and beauty. When people talk about their dislike of the season because it is filled with death, I am shocked. So, I decided to combine the two concepts. Nature doesn't limp out its death; it explodes in a rain of color, making itself known. There is beauty in that, a beauty in death that is often forgotten. Too often we humans mourn our losses and pity ourselves, forgetting the true wonders that exist in the cycle of life. I embroidered the words "beauty in" on one balloon and "death" on the other to express that.
     In order to have the words be read, I decided to have the two balloons on different levels. I balanced one balloon on a light on top of a candlestick on top of a box, and hung the other one from the ceiling. The copper wire inside the balloon allowed it to balance on top of the light without it falling through. When lit up in the dark, the colors of the leaves are revealed.
     Although my leaf balloons didn't turn out the way I originally imagined, I like the spontaneity of the shapes. The gloss is fairly malleable, so the shape changes when you push on it. Though my domes aren't perfectly spherical, their lumpy shapes are fun and reinforce the message. Leaving the second balloon without a light also adds to the effect of 'death.'
The final result, in the light and in the dark.


Thursday, November 21, 2013

Time as an Element: Time Heals All Things

"Time Heals All Things" -- wood, sand, acrylic, miscellaneous
Original ideas
     For our third project in Art III, we had only one guideline: incorporate time as an element. Inspired by someone else's use of butterflies, my first idea combined chromatography and metal working to create a butterfly sculpture. The wings would be filter paper with marker, and over time water would marble the colors. I also thought of making a giant hourglass and gluing random knick-knacks and whatnot to the bottom, so as time passed the sand would cover them as if they'd been erased by time. In thinking about this principle, I stumbled on my final idea. Time can erase memories in a negative sense, but the passage of time is also very healing. As time goes on, our anger, pain, and loss are soothed, glossed over, and forgotten. Including an interactive and meditative aspect in my project would allow each person to make it his own and hopefully gain something from the experience.
Staining the frame
Nailing the frame together
     In designing this piece, I had to come from an unusual direction. Normally the focus in creating art is making it as visually appealing as possible; this time, I had to look at it from an engineering angle. I wanted people to be able to write in the sand and have their pictures and images washed away, but this meant that I had to have a source of the water and a way for it to run off. The containers had to be waterproof, but also have an aesthetic element. After some planning, I decided on a design that had a box frame with mesh on the bottom to drain the water placed above a 9x9 cake pan which would hold the water. I would then attach a fountain and nail holes in a piece of plastic tubing to disperse the water over the width of the box. I balanced the frame at an angle to the cake pan so the water would drain downhill. 
"You may delay, but time will not"
 -- Ben Franklin
Assembly
     To make the frame more visually appealing, I painted three quotes on the sides: "Time heals all," "'Time takes all, whether you want it to or not' -- Stephen King," and "'You may delay, but time will not' -- Ben Franklin" in white acrylic paint and then stained over the whole thing. Because acrylic paint is water based and the wood stain I used was oil based, the white paint shone through the dark stain to reveal the words. In total materials, I used: four 9-inch-long pieces of wood, nails (and a hammer), staples (and a staple gun), plastic mesh, Weldbond glue, dark walnut stain, white acrylic paint, sand from a baseball field and a volleyball court, PVC pipe, two widths of plastic tubing, a 9x9 cake pan, duct tape, black spray paint, black acrylic paint, black rubber spray paint, foam board, packing tape, a water pump, and water. After all the effort I put into making this project, my original idea failed. The grain of the mesh wasn't fine enough to hold sand the right size; the sand I ended up using was too big to be moved by the water. To salvage the principles I was trying to portray, I turned to water color. Instead of moving the sand itself, I encourage people to paint on top of it. The water eventually would wash it away. This failure demonstrates the risks I took in making "Time Heals All Things." Starting this project, I was creating something that had never been tried before. I had to be innovative with my materials, taking multiple trips to hardware, grocery, and craft stores to find the perfect fountain or cake pan. I had to redo things several times -- spray painting things made them sticky, and nailing holes in plastic didn't work as well as using an Xacto knife. After much trial and error, my final project emerged. And it worked!


Friday, October 11, 2013

Intertextuality: Star Wars and Honeybuns

 
"A New Hope for the Hungry" -- acrylic on canvas
     For our second project in Art III, we were given the theme of intertextuality. Intertextuality involves combining unrelated objects or concepts to change meaning. For example, if you draw a Disney princess and put a gun in her hand, she is no longer innocent and adorable. I had several ideas, but none of them were very exciting. I thought of putting Kermit the muppet next to a real frog, creating a giant cockroach and having it attack Apex High School, and having a chicken sitting on top of Big Bird as an egg. Instead of these, I decided to recreate a scene in Star Wars Episode IV: A New Hope, but have Leia's hair be honeybuns that Han Solo is eating. The honeybuns and Han's sneakiness change a scene filled with tension in the movie into one with playfulness and humor. This idea felt the most interesting, and I just couldn't get it out of my head.
      Originally I wanted to paint the background, then photo transfer images of Han and Leia onto the canvas and touch them up with paint. To get the transfer to show up, I had to first paint white silhouettes of the people. I then covered with the area with a clear acrylic gloss and placed the pictures face-down. Unfortunately, I wasn't fast enough, and the photo transfer worked hardly at all, so I ended up doing the whole thing in acrylic. Painting all of the details in Han and Leia was painstaking, and took about a week to finish. While the faces aren't exactly how I had imagined them, I am happy with the end result.
      The risks I took in this project were minor, but had a major impact. This was the first time I had ever attempted a photo transfer -- and it failed. I had also never painted people before, only trees and images without shading.
      Of the five characteristics of great art, I think concept and emotion were most prominent in my piece. The technique and medium are nothing new or unique, but as far as I know my idea is original. The art also provoked a wide range of reactions, including laughter and being grossed out. Personally, I find it funny.
     My favorite thing about painting -- and art in general -- is the creation process. Starting with only a white canvas and five colors -- red, blue, yellow, white, and black -- I could create this painting, with all of its variation in color and shadow.

Wednesday, September 11, 2013

Text as an Element: Culture

Whoopie Pies -- Pen and Watercolor

Practicing watercolor on a scrap sheet.
     For our first project in Art III, we were instructed to think about the word culture -- its meaning relative to us, relative to the world, and just in general -- and then create a piece incorporating text as an element with culture as its theme. To me, culture means many things, including general concepts like language and art, but I chose to make something themed around a culture specific to me: my Mennonite background.
Painting the watercolor background.
     Mennonites are a group of Protestant Christians who believe especially in pacifism, community, and following Jesus in everyday life. There are only a couple million of us in the world, and because of our small numbers, we Mennonites have formed our own special culture. For me, this aspect of my culture can be symbolized by a somewhat traditional and absolutely delicious desert: whoopie pies.
     Originally for my project I was going to use only pen and ink, creating the image of the whoopie pies using text from a recipe for them. This ended up being too mundane, so I used watercolors to add color and create a plastic-bag effect before writing the recipe over the contours of the pies and then adding in pen to outline the pies and plastic bag. Also, to try to make the bag more realistic, I crumpled up plastic wrap and placed it over the wet watercolors, making some parts lighter than others. I then painted over certain parts to adjust the shading to my liking. It's not my favorite project, but I do like the way the plastic bag came out.
If you look closely, you can read how to make your own delicious whoopie pies!